Lsi Megaraid Storage Manager Software Download Updated FREE
Lsi Megaraid Storage Manager Software Download
Storage Controller Considerations
This appendix provides storage controller (RAID and HBA) data.
Supported Storage Controllers and Cables
This server supports a single, PCIe-style, SAS RAID or HBA controller that plugs into a defended internal riser. Alternatively, the server has a software-based SATA RAID controller embedded in the organisation.
 Notation | Practice not mix controller types in the server. Do not use the embedded SATA controller and a hardware-based RAID controller card at the same time. This combination is non supported and could effect in data loss. |
| Annotation | NVMe PCIe SSDs cannot be controlled by a SAS/SATA RAID controller. |
This server supports the RAID and HBA controller options and cable requirements shown in the following table.
| Controller | Server Version/Maximum Drives Controlled | RAID Levels | Optional Supercap Backup? | Required Cables |
| Embedded RAID (PCH SATA) | This controller is supported only in these server versions:
| 0, 1, 10 | No | Use SAS/SATA cable included with chassis to connect interposer board to drive backplane. |
| Cisco 12G Modular RAID Controller Controller is orderable only as UCSC-MRAID1G-KIT | This controller is supported merely in this server version:
| 0, 1, 5, half dozen, 10, 50, 60 JBOD fashion is also supported. | Yes | Use SAS/SATA cable included with chassis to connect controller to drive backplane. |
| Cisco 12G Modular RAID Controller with 2-GB cache UCSC-RAID-M5 Includes 2-GB cache | This controller is supported but in these server versions:
| 0, 1, 5, 6, 10, l, 60 JBOD mode is too supported. | Yes | Use SAS/SATA cable included with chassis to connect controller to drive backplane. |
| Cisco 12G Modular SAS HBA UCSC-SAS-M5 | This controller is supported only in these server versions:
| Non-RAID | No | Use SAS/SATA cable included with chassis to connect controller to drive backplane. |
| Cisco 12G 9400-8e HBA for external JBOD attach UCSC-9400-8E | Supported in all server versions: 8 external SAS/SATA ports, controlling up to 1024 external drives. | Non-RAID | No | External drive cables not sold by Cisco. NOTE: This HBA does not back up optical cables for connection to external storage (copper only). |
| Cisco Kick-Optimized One thousand.2 RAID Controller UCS-M2-HWRAID | Supported in all server versions. Controls two SATA M.2 drives that mount to this controller. | 1 JBOD mode is also supported. | No | None. Controller connects to motherboard socket. |
Storage Controller Bill of fare Firmware Compatibility
Firmware on the storage controller (RAID or HBA) must be verified for compatibility with the current Cisco IMC and BIOS versions that are installed on the server. If non compatible, upgrade or downgrade the storage controller firmware using the Cisco Host Upgrade Utility (HUU) for your firmware release to bring it to a compatible level.
See the HUU guide for your Cisco IMC release for instructions on downloading and using the utility to bring server components to compatible levels: HUU Guides.
| Note | For servers running in standalone mode only: Later on you replace controller hardware, you must run the Cisco Host Upgrade Utility (HUU) to update the controller firmware, even if the firmware Current Version is the aforementioned as the Update Version. This is necessary to programme the controller'southward suboem-id to the correct value for the server SKU. If you do non do this, drive enumeration might non display correctly in the software. This issue does not affect servers controlled in UCSM mode. |
RAID Backup (Supercap)
This server supports installation of 1 supercap unit. The unit mounts to a bracket in-line with the fan modules.
The optional SCPM provides approximately iii years of backup for the disk write-dorsum cache DRAM in the case suddenly ability loss by offloading the enshroud to the NAND wink.
For supercap unit replacement instructions, see Replacing the Supercap (RAID Fill-in).
Write-Cache Policy for Cisco 12G SAS Modular RAID Controller
For this server and other Cisco Generation M5 servers, the default write-cache policy for the Cisco Modular RAID controller is Write Through (irrespective of the presence of a charged Supercap or "practiced BBU"). This utilizes the optimal performance characteristics of the controller.
The write policy can be gear up to Write Back, if preferred. Yous can prepare the write policy using the following methods:
-
For standalone servers, use the Cisco IMC interface to set Virtual Drive Backdrop > Write Policy. Meet the "Managing Storage Adapters" section in your Cisco IMC Configuration Guide.
Cisco IMC GUI and CLI Configuration Guides
-
For Cisco UCS-integrated servers, use the Cisco UCS Manager interface to set the write-enshroud policy as part of virtual drive configuration in your storage profile.
Cisco UCS Manager Configuration Guides
-
Use the LSI Option ROM Configuration Utility.
Mixing Drive Types in RAID Groups
The following table lists the technical capabilities for mixing hard disk drive drive (HDD) and solid state drive (SSD) types in a RAID group. Yet, run into the recommendations that follow for the all-time performance.
| Mix of Drive Types in RAID Group | Allowed? |
| SAS HDD + SATA HDD | Yes |
| SAS SSD + SATA SSD | Yes |
| HDD + SSD | No |
Drive Type Mixing Best Practices
For the best operation follow these guidelines:
-
Employ either all SAS or all SATA drives in a RAID grouping.
-
Apply the aforementioned capacity for each bulldoze in the RAID group.
-
Never mix HDDs and SSDs in the same RAID group.
RAID Controller Migration
This server supports SAS/SATA hardware RAID (controller card) and embedded software SATA RAID. You cannot use hardware RAID and software RAID at the same time. See the table below for which data migrations are immune and a summary of migration steps.
| Starting RAID Controller | Drift to Hardware RAID Allowed? | Migrate to Software RAID Allowed? | ||
| None (no drives). Embedded RAID is disabled in the BIOS. | Allowed
| Allowed
| ||
| Embedded software RAID. Embedded RAID is enabled in the BIOS. |
Immune only before at that place is data on the drives; data migration is non supported.
| - | ||
| Hardware RAID. Embedded RAID is disabled in the BIOS. | - | Not allowed. |
Storage Controller and Backplane Connectors
This section describes cabling connections for the storage controllers and the backplane. The SAS/SATA cables are manufactory-installed and are used for all supported internal controllers in both the SFF 10-bulldoze (UCSC-C220-M5SX) and LFF 4-drive (UCSC-C220-M5L) versions of the server.
This department too contains diagrams that show the cable-to-bulldoze mapping.
| Note | The SFF 10-bulldoze version UCSC-C220-M5SN supports NVMe drives simply, and so does non use SAS or SATA RAID. This version of the server comes with an NVMe-switch card factory-installed in the internal mRAID riser and a PCIe cablevision connected to PCIe riser 2. The NVMe switch bill of fare is non orderable separately. |
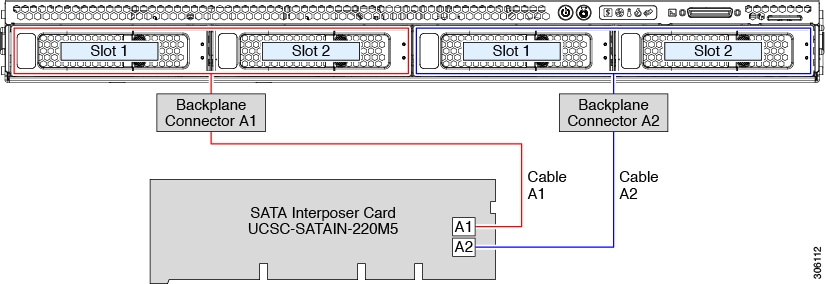
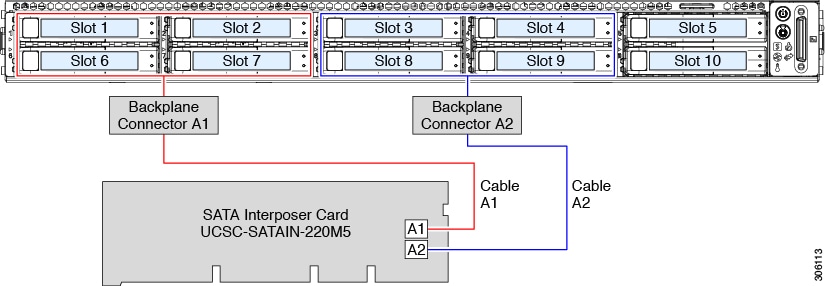
Embedded RAID
This SW RAID option can control upward to eight SATA drives in the SFF 10-drive version and upwards to 4 SATA drives in the LFF 4-drive version.
This embedded RAID selection requires that you have a SATA interposer carte installed in internal mRAID riser iii. Employ the SAS/SATA cables that came with the server.
-
Connect SAS/SATA cable A1 from the A1 interposer connector to the A1 backplane connector.
-
Connect SAS/SATA cable A2 from the A2 interposer connector to the A2 backplane connector.
| Annotation | See the following figures that illustrate cablevision connections and which drives are controlled past each cablevision. In the SFF 10-drive version, drives five and x cannot be controlled by the embedded SATA RAID controller. |
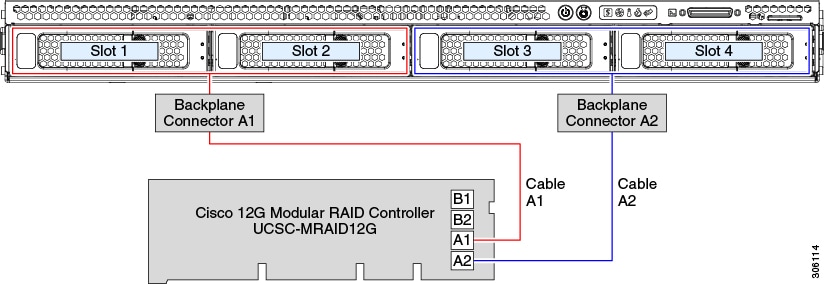
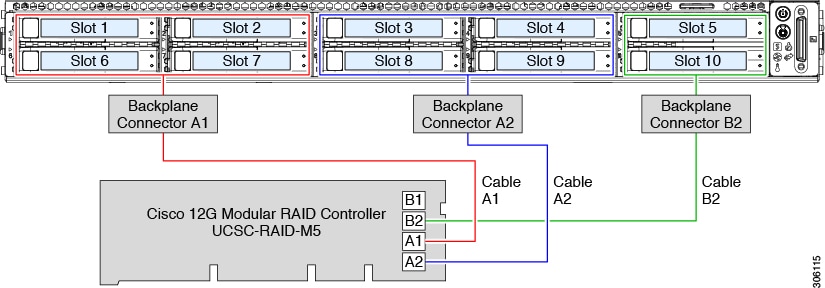
Cisco 12G Modular SAS RAID Controller or HBA
This HW RAID option can control upwards to x SAS/SATA drives in the SFF 10-drive version and up to four SAS/SATA drives in the LFF 4-bulldoze version.
This selection requires that you accept a SAS RAID or HBA bill of fare installed in internal mRAID riser 3. Utilise the SAS/SATA cables that came with the server.
-
Connect SAS/SATA cable A1 from the A1 card connector to the A1 backplane connector.
-
Connect SAS/SATA cable A2 from the A2 card connector to the A2 backplane connector.
-
For SFF-10-bulldoze servers merely: Connect SAS/SATA cable B2 from the B2 carte du jour connector to the B2 backplane connector.
| Note | Run across the following figures that illustrate cable connections and which drives are controlled by each cable. |
Embedded SATA RAID Controller
This server includes an embedded MegaRAID controller that supports RAID levels 0 and 1. The primary controller can command upwardly to eight front-loading SATA-only drives. The secondary controller tin can control two internal Thou.2 SATA drives.
| Notation | The VMware ESX/ESXi operating organisation is non supported with the embedded SATA MegaRAID controller in SW RAID manner. Y'all can use VMWare in AHCI mode. |
| Notation | The Microsoft Windows Server 2016 Hyper-V hypervisor is supported for use with the embedded MegaRAID controller in SW RAID mode, just all other hyperviors are not supported. All Hypervisors are supported in AHCI mode. |
| Note | You cannot command the M.2 SATA SSDs in the server with a HW RAID controller. |
Embbeded SATA RAID Requirements
The embedded SATA RAID controller requires the following items:
-
Interposer menu UCSC-SATAIN-220M5. This must exist installed in internal mRAID riser iii.
-
The SAS/SATA cables that are preinstalled in the chassis.
-
Principal controller: SATA drives only (up to eight, in front drive bays 1–8).
-
Secondary controller: K.two mini-storage module with two SATA M.2 SSDs.
-
The embedded SATA RAID controllers must exist enabled in the server BIOS. If you ordered the server with embedded SATA RAID, it is enabled at the factory.
-
(Optional) LSI MegaSR drivers for Windows or Linux.
-
The software RAID controller requires UEFI boot mode; Legacy boot mode is non supported.
-
If you lot employ an embedded RAID controller with Linux, both the pSATA and the sSATA controller must exist set to
LSI SW RAIDmode.
Embedded SATA RAID Controller Considerations
Note the following considerations:
-
The default setting for this embedded controller hub is SATA RAID 0, 1, and ten support for up to viii front-loading SATA drives, and upwardly to two internal M.ii SATA drives. The hub is divided into 2 SATA controllers that have different functions. Come across Embedded SATA RAID: Two SATA Controllers.
-
When you lot gild the server with this embedded controller, the controller is enabled in the BIOS. Instructions for enabling the controller are included for the case in which a server is reset. Run into Enabling SATA Mode For the Embedded Controllers.
-
You cannot downgrade from using a hardware RAID controller menu to using the software RAID embedded controller (see RAID Controller Migration).

Caution
Data migration from software RAID (embedded RAID) to hardware RAID (a controller menu) is not supported and could result in data loss. Migrations from software RAID to hardware RAID are supported only before there is data on the drives, or when there are no drives in the server.
-
The required drivers for this controller are already installed and ready to use with the LSI SWRAID Configuration Utility. Nevertheless, if you lot will use this controller with Windows or Linux, yous must download and install additional drivers for those operating systems. See Installing LSI MegaSR Drivers For Windows and Linux.
Embedded SATA RAID: 2 SATA Controllers
The embedded RAID platform controller hub (PCH) is split into 2 controllers: primary SATA (pSATA) and secondary SATA (sSATA). These two controllers are seen as separate RAID controllers in the Cisco IMC interface and are configurable separately.
-
SFF ten-drives server UCSC-C220-M5SX:
-
The pSATA controller controls upwards to eight front SATA drives (bulldoze bays ane–eight).
-
The sSATA controller controls two internal SATA M.2 drives, when they are present in the M.2 mini-storage module option.
-
If the M.two mini-storage module is not present, or if M.ii NVMe drives are installed in the mini-storage module, the sSATA controller is automatically disabled.
-
-
SFF 10-drives NVMe-optimized server UCSC-C220-M5SN:
-
The pSATA controller is disabled.
-
The sSATA controller controls two internal SATA One thousand.two drives, when they are nowadays in the M.ii mini-storage module option.
-
If the M.2 mini-storage module is non present, or if Thousand.2 NVMe drives are installed in the mini-storage module, the sSATA controller is automatically disabled.
-
-
LFF 4-drives server UCSC-C220-M5L:
-
The pSATA controller controls front-loading SATA drives in bays one-4.
-
The sSATA controller controls two internal SATA M.2 drives, when they are present in the Yard.2 mini-storage module choice.
-
If the M.2 mini-storage module is not present, or if M.2 NVMe drives are installed in the mini-storage module, the sSATA controller is automatically disabled.
-
-
Each controller is listed separately in the BIOS. You can enable or disable the controllers in the BIOS. Come across Embedded SATA RAID: Two SATA Controllers.
Enabling SATA Mode For the Embedded Controllers
This procedure uses the server's BIOS Setup Utility.
| Note | If you use an embedded RAID controller with Linux, both the pSATA and the sSATA controller must exist prepare to LSI SW RAID style. |
Process
| Step 1 | Boot the server and printing F2 when prompted to enter the BIOS Setup utility. |
| Step 2 | Set the SATA way: |
| Footstep 3 | Printing F10 to save your changes and exit the utility. |
Accessing the Software RAID Configuration Utility
To configure RAID settings for the embedded SATA RAID controllers, use the utility that is built into the BIOS. Each controller is controlled by its own example of the utility.
Procedure
| Footstep 1 | Boot the server and press F2 when prompted to enter the BIOS Setup utility. |
| Step 2 | Choose the Avant-garde tab. |
| Stride three | Select the case of the utility that is for the controller that yous desire to manage (primary or secondary):
|
Installing LSI MegaSR Drivers For Windows and Linux
| Note | The required drivers for this controller are already installed and ready to use. However, if yous will utilise this controller with Windows or Linux, you must download and install additional drivers for those operating systems. |
This section explains how to install the LSI MegaSR drivers for the following supported operating systems:
-
Microsoft Windows Server
-
Cherry-red Hat Enterprise Linux (RHEL)
-
SUSE Linux Enterprise Server (SLES)
For the specific supported Bone versions, see the Hardware and Software Compatibility Matrix for your server release.
Downloading the MegaSR Drivers
The MegaSR drivers are included in the C-Serial driver ISO for your server and Bone.
Procedure
| Stride 1 | Notice the drivers ISO file download for your server online and download it to a temporary location on your workstation:
|
| Footstep 2 | Go on through the subsequent screens to accept the license agreement and so browse to a location where you want to save the driver ISO file. |
Microsoft Windows Server Drivers
Installing Microsoft Windows Server Drivers
The Windows Server operating system automatically adds the driver to the registry and copies the driver to the appropriate directory.
Before you begin
Before you install this driver on an embedded controller, you lot must configure a RAID drive group on the embedded controller for the drives where yous will install the Bone (pSATA and/or sSATA).
To admission the configuration utility, open the BIOS Setup Utility, become to the Advanced tab, and then cull the utility example for the embedded controller:
-
For pSATA, select LSI Software RAID Configuration Utility (SATA)
-
For sSATA, select LSI Software RAID Configuration Utility (sSATA)
Process
| Step ane | Download the Cisco UCS C-Serial drivers' ISO, as described in Downloading the MegaSR Drivers. |
| Stride two | Set up the drivers on a USB thumb drive:
|
| Step three | Offset the Windows commuter installation using 1 of the following methods:
|
| Step 4 | Launch a Virtual KVM console window and click the Virtual Media tab.
|
| Step 5 | Power cycle the server. |
| Step 6 | Press F6 when yous see the F6 prompt during bootup. The Kicking Bill of fare window opens. |
| Step 7 | On the Boot Manager window, choose the physical disk or virtual DVD and press Enter. The Windows installation begins when the image is booted. |
| Step 8 | Press Enter when you lot see the prompt, "Printing any key to boot from CD." |
| Step 9 | Observe the Windows installation process and answer to prompts in the magician as required for your preferences and visitor standards. |
| Step x | When Windows prompts you lot with "Where exercise yous desire to install Windows," install the drivers for embedded MegaRAID: |
Updating Microsoft Windows Server Drivers
Procedure
| Step i | Click Start, bespeak to Settings, and then click Command Panel. |
| Stride 2 | Double-click System, click the Hardware tab, and so click Device Manager. Device Director starts. |
| Step 3 | In Device Managing director, double-click SCSI and RAID Controllers, right-click the device for which you are installing the driver, and then click Properties. |
| Step four | On the Driver tab, click Update Driver to open the Update Device Commuter sorcerer, and so follow the wizard instructions to update the driver. |
Linux Drivers
Dowloading the Driver IMG or ISO File
Meet Downloading the MegaSR Drivers for instructions on downloading the drivers. Within the Cisco UCS Drivers ISO image, the MegaSR driver is included in a dud-[commuter version].img (or dd.iso).
| Note | The LSI MegaSR drivers that Cisco provides for RHEL and SLES are for the original GA versions of those distributions. The drivers do not support updates to those OS kernels. |
Preparing Physical Thumb Drive for Linux
This topic describes how to prepare physical Linux pollex drive from the driver image files.
This procedure requires a CD or DVD bulldoze that you tin can use to burn the ISO prototype to deejay; and a USB thumb drive.
Alternatively, you tin mount the dud.img file as a virtual disk, as described in the installation procedures.
For RHEL and SLES, you can use a driver disk utility to create disk images from image files.
Procedure
| Pace 1 | Download the Cisco UCS C-Series drivers ISO, as described in Downloading the MegaSR Drivers and save it to your Linux organization. | ||
| Footstep ii | Extract the dud.img or dd.iso driver file:
| ||
| Pace iii | Copy the driver update disk prototype | ||
| Step four | Insert a bare USB thumb drive into a port on your Linux system. | ||
| Pace 5 | Create a directory and mount the dud.img or dd.iso image to that directory: Example: | ||
| Step vi | Copy the contents in the directory to your USB thumb drive. |
Installing the Crimson Hat Enterprise Linux Driver
For the specific supported Bone versions, see the Hardware and Software Compatibility Matrix for your server release.
This topic describes the fresh installation of the RHEL device commuter on systems that take the embedded MegaRAID stack.
| Note | If yous use an embedded RAID controller with Linux, both the pSATA and the sSATA controller must exist set to |
Earlier you begin
Before y'all install this driver on an embedded controller, y'all must configure a RAID bulldoze group on the embedded controller that controls the drives where you volition install the OS (pSATA and/or sSATA).
To access the configuration utility, open the BIOS Setup Utility, go to the Advanced tab, and then choose the utility instance for the embedded controller:
-
For pSATA, select LSI Software RAID Configuration Utility (SATA)
-
For sSATA, select LSI Software RAID Configuration Utility (sSATA)
Process
| Step ane | Prepare the
| ||
| Step ii | Extract the | ||
| Step iii | Start the Linux commuter installation using one of the following methods:
| ||
| Pace 4 | Launch a Virtual KVM console window and click the Virtual Media tab. | ||
| Pace 5 | Power-bike the target server. | ||
| Step 6 | Press F6 when you see the F6 prompt during bootup. The Boot Menu window opens.
| ||
| Footstep 7 | On the Boot Card window, use the pointer keys to select Install Red Lid Enterprise Linux so press east to edit installation parameters. | ||
| Footstep 8 | Append one of the following blacklist commands to the end of the line that begins with linuxefi:
| ||
| Step 9 | Optional: To see full, verbose installation status steps during installation, delete the Quiet parameter from the line. | ||
| Pace x | On the Boot Bill of fare window, press Ctrl+x to commencement the interactive installation. | ||
| Footstep 11 | Below Commuter disk device selection, select the choice to install your driver .img file. (Type r to refresh the list if it is not populated.)
Type the number of the commuter device ISO in the listing. Do non select the RHEL ISO image. In the following example, type 6 to select device sdb: The installer reads the driver file and lists the drivers. | ||
| Footstep 12 | Under Select drivers to install, type the number of the line that lists the megasr driver. In the following example, type 1: Your selection is displayed with an Ten in brackets. | ||
| Step xiii | Type c to continue. | ||
| Pace xiv | Follow the RHEL installation wizard to complete the installation. | ||
| Pace 15 | When the wizard'southward Installation Destination screen is displayed, ensure that LSI MegaSR is listed as the selection. If it is not listed, the commuter did not load successfully. In that case, select Rescan Disc. | ||
| Footstep 16 | Subsequently the installation completes, reboot the target server. |
Installing the SUSE Linux Enterprise Server Driver
For the specific supported Os versions, see the Hardware and Software Compatibility Matrix for your server release.
This topic describes the fresh installation of the SLES driver on systems that accept the embedded MegaRAID stack.
| Notation | If yous use an embedded RAID controller with Linux, both the pSATA and the sSATA controller must be set to |
Before you begin
Before you install this driver on an embedded controller, you must configure a RAID drive group on the embedded controller that controls the drives where y'all will install the Os (pSATA and/or sSATA).
To access the configuration utility, open up the BIOS Setup Utility, get to the Advanced tab, and then choose the utility example for the embedded controller:
-
For pSATA, select LSI Software RAID Configuration Utility (SATA)
-
For sSATA, select LSI Software RAID Configuration Utility (sSATA)
Procedure
| Step i | Set up the
|
| Step 2 | Extract the
|
| Step 3 | Kickoff the Linux driver installation using one of the following methods:
|
| Step 4 | Launch a Virtual KVM panel window and click the Virtual Media tab.
|
| Step 5 | Power-cycle the target server. |
| Stride 6 | Printing F6 when you lot run into the F6 prompt during bootup. The Kick Bill of fare window opens. |
| Step 7 | On the Kick Manager window, select the concrete or virtual SLES installation ISO and printing Enter. The SLES installation begins when the image is booted. |
| Footstep eight | When the offset SLES screen appears, select Installation. |
| Stride nine | Printing due east to edit installation parameters. |
| Step 10 | Append the following parameter to the end of the line that begins with linuxefi: |
| Step 11 | Optional: To run across detailed status data during the installation, add the following parameter to the line that begins with linuxefi: |
| Stride 12 | Press Ctrl+x to commencement the installation. The installation gain. The installer finds the LSI driver automatically in the |
| Step xiii | Follow the SLES installation wizard to complete the installation. Verify installation of the commuter when you achieve the Suggested Partitioning screen: |
| Step 14 | When installation is consummate, reboot the target server. |
For More RAID Utility Information
The Broadcom utilities take help documentation for more than data virtually using the utilities.
-
For basic information virtually RAID and for using the utilities for the RAID controller cards that are supported in Cisco servers, see the Cisco Servers RAID Guide.
-
For hardware SAS MegaRAID configuration—Broadcom 12Gb/south MegaRAID SAS Software User Guide, Version two.viii
-
For embedded software MegaRAID and the utility that is accessed via the server BIOS (refer to Chapter 4)—Broadcom Embedded MegaRAID Software User Guide, March 2018.
Lsi Megaraid Storage Manager Software Download
DOWNLOAD HERE
Source: https://www.cisco.com/c/en/us/td/docs/unified_computing/ucs/c/hw/C220M5/install/C220M5/C220M5_appendix_0100.html
Posted by: millerworeavelesor1956.blogspot.com